Articles
Building A Lifting Platform on a Slope
September 13 2007

September 13 2007

You want an outdoor weightlifting platform. Maybe indoor space is limited, or maybe you just want to boost testosterone with 20-rep squats in the sun. But for some silly reason, the folks who built your facility were concerned with water drainage and the area in which you want your platform is sloped. Sloped weightlifting platforms, it turns out, don't work well.
I ran into this problem when building a weightlifting platform for NorCal Strength & Conditioning. Overcoming the slope turned out to be pretty simple.
Following is a simple guide to building a weightlifting platform on a slope. If you don't have a slope and just want a platform, simply omit the timber support structure.
You will need:
1. Seal the Wood
Get this over with right away because it's the most heinous part. Paint a coat or two of water sealer on the plywood and MDF. Make sure you get the edges and let it dry completely before screwing the sheets together.
2. Figure Out the Slope Particulars
You'll need to determine the slope of your surface before you can cut the timbers. There are elegant mathematical methods of doing this, but if you're like me, you're far too impatient to even consider them. Instead, we'll just use our gear to figure it out.
Lay one of your 4 x 4 timbers longitudinally over the slope. Place the level on it and shim the low end until the timber is level. Measure the gap between the ground and the bottom of the timber at the low end and there's your rise for the 8' run.
3. Mark and Cut the Support Timbers
Because we want water to be able to drain underneath the platform, we need the edge on the high end to be elevated as well as the low end. How much we can elevate it will depend on the slope we're on.
Measure the rise you found at one end of a 4x4 timber. Draw a line from this mark to the opposite corner of the other end of the timber – we now have the slope marked on the side of the timber. Unless your slope is greater than 4" over 8', this will leave some timber to provide our elevation for drainage. (If your slope is greater than 4" over 8', you'll need to use different support timbers)
Cut one of the timbers along the line you've drawn, lay it cut-side-down on your slope, and check its levelness. If it's off, you messed up. Fix your mistake before cutting the remaining timbers.
When all your timbers have been cut, you'll be left with some thinner pieces. We'll use them to add some extra support. Align each with the main timbers so the thicknesses match and mark them where you'll need to cut to get rid of the excess.

4. Build the Support Frame
Lay your cut timbers on your slope where you want your platform positioned because moving the assembly will prove difficult. You can use the pine 2x3 as a straight edge to align the ends of the timbers.
Once the timbers are arranged correctly, screw the 2x3 to the ends of the timbers at the low side of the slope.
Lay the short timbers alongside the main timbers to provide a little extra footing at the points at which the most force will be received.


5. Lay Down the Plywood
Now that we have the timber support frame laid out, lay two of the plywood sheets on top running lengthwise with the slope. Then lay the other two plywood sheets on top in the opposite direction. Square away all the edges and screw the sheets together and to the support timbers.
Note: You can assemble the plywood platform before laying it onto the frame, but be warned that an assembly of 4 sheets of ¾" plywood is a fairly cumbersome item to maneuver.


6. Lay Down the MDF
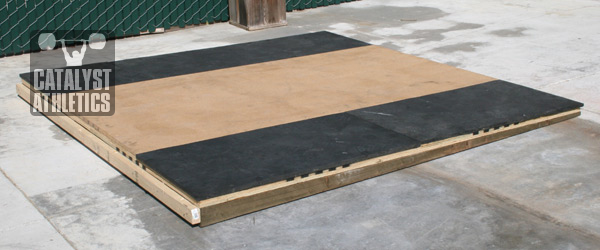
Lay the sheet of MDF lengthwise down the center of the platform, aligning the ends with the plywood edges with 2' on each side. Screw it down to the plywood.
Note: If you prefer a narrower lifting area, cut the MDF and mats accordingly. My suggestion is cutting the board to 3' 6" wide and the mats to 2' 3" wide each. I use MDF because it's a smooth, hard surface that needs no finishing, and is relatively inexpensive, so it can be replaced when needed without too much of a hit to the wallet.
7. Lay Down the Matting
Measure a 2'x8' section of horse stall matting for each side of the platform. Use a utility knife to make the cuts. Cutting is easiest if you first make a light score along the line you intend to cut, and then continue making light cuts within it. You can also spread the mat around the cut to allow easier blade travel by sliding a length of wood underneath just to one side of the cut.
Lay the matting along the sides of the platform snugly and screw it down.
8. Rejoice
Your platform is done now. Go grab something heavy and get to lifting.

Maintenance
Keep the platform covered with a waterproof tarp when not in use. The wood is sealed, but it's not sealed that well, and particle board does not get along with water.
You may want to replace the particle board occasionally because it will likely chip and/or experience some water damage, replacement is inexpensive and easy to do.
I ran into this problem when building a weightlifting platform for NorCal Strength & Conditioning. Overcoming the slope turned out to be pretty simple.
Following is a simple guide to building a weightlifting platform on a slope. If you don't have a slope and just want a platform, simply omit the timber support structure.
You will need:
- Plywood – (4) 4' x 8' sheets ¾" thick CDX grade
- MDF – (1) 4' x 8' sheet ¾" thick. Find a quality piece.
- Timbers – (9-12) 4 x 4 deck pressure treated deck timbers.
- 2 x 3 – (1) 8' pine.
- Matting – Horse stall mats ¾" thick. You'll need 2 2'x8' pieces. Typically the mats come in 4' x 6' sections, so you'll have to do some cutting and pasting.
- Drywall screws - 1 ¼" and 2"
- Level
- Drill/Electric screwdriver (if you're not Amish)
- Circular Saw (if you're not Amish)
- Water sealer
- Paint brush
1. Seal the Wood
Get this over with right away because it's the most heinous part. Paint a coat or two of water sealer on the plywood and MDF. Make sure you get the edges and let it dry completely before screwing the sheets together.
2. Figure Out the Slope Particulars
You'll need to determine the slope of your surface before you can cut the timbers. There are elegant mathematical methods of doing this, but if you're like me, you're far too impatient to even consider them. Instead, we'll just use our gear to figure it out.
Lay one of your 4 x 4 timbers longitudinally over the slope. Place the level on it and shim the low end until the timber is level. Measure the gap between the ground and the bottom of the timber at the low end and there's your rise for the 8' run.
3. Mark and Cut the Support Timbers
Because we want water to be able to drain underneath the platform, we need the edge on the high end to be elevated as well as the low end. How much we can elevate it will depend on the slope we're on.
Measure the rise you found at one end of a 4x4 timber. Draw a line from this mark to the opposite corner of the other end of the timber – we now have the slope marked on the side of the timber. Unless your slope is greater than 4" over 8', this will leave some timber to provide our elevation for drainage. (If your slope is greater than 4" over 8', you'll need to use different support timbers)
Cut one of the timbers along the line you've drawn, lay it cut-side-down on your slope, and check its levelness. If it's off, you messed up. Fix your mistake before cutting the remaining timbers.
When all your timbers have been cut, you'll be left with some thinner pieces. We'll use them to add some extra support. Align each with the main timbers so the thicknesses match and mark them where you'll need to cut to get rid of the excess.

4. Build the Support Frame
Lay your cut timbers on your slope where you want your platform positioned because moving the assembly will prove difficult. You can use the pine 2x3 as a straight edge to align the ends of the timbers.
Once the timbers are arranged correctly, screw the 2x3 to the ends of the timbers at the low side of the slope.
Lay the short timbers alongside the main timbers to provide a little extra footing at the points at which the most force will be received.


5. Lay Down the Plywood
Now that we have the timber support frame laid out, lay two of the plywood sheets on top running lengthwise with the slope. Then lay the other two plywood sheets on top in the opposite direction. Square away all the edges and screw the sheets together and to the support timbers.
Note: You can assemble the plywood platform before laying it onto the frame, but be warned that an assembly of 4 sheets of ¾" plywood is a fairly cumbersome item to maneuver.


6. Lay Down the MDF
Lay the sheet of MDF lengthwise down the center of the platform, aligning the ends with the plywood edges with 2' on each side. Screw it down to the plywood.
Note: If you prefer a narrower lifting area, cut the MDF and mats accordingly. My suggestion is cutting the board to 3' 6" wide and the mats to 2' 3" wide each. I use MDF because it's a smooth, hard surface that needs no finishing, and is relatively inexpensive, so it can be replaced when needed without too much of a hit to the wallet.
7. Lay Down the Matting
Measure a 2'x8' section of horse stall matting for each side of the platform. Use a utility knife to make the cuts. Cutting is easiest if you first make a light score along the line you intend to cut, and then continue making light cuts within it. You can also spread the mat around the cut to allow easier blade travel by sliding a length of wood underneath just to one side of the cut.
Lay the matting along the sides of the platform snugly and screw it down.
8. Rejoice
Your platform is done now. Go grab something heavy and get to lifting.

Maintenance
Keep the platform covered with a waterproof tarp when not in use. The wood is sealed, but it's not sealed that well, and particle board does not get along with water.
You may want to replace the particle board occasionally because it will likely chip and/or experience some water damage, replacement is inexpensive and easy to do.

Handheld circular saw.
They are spaced out but concentrated where the feet to reinfoce the areas that will take force. Under step 4 there are two pictures of the timbers on the bottom.
Thanks for this post (as well as all of your others). I'm looking to build a platform to use indoors and on a flat concrete surface. I assume that the construction you would recommend would be the same, I just wouldn't need the timbers. Do you still use MDF for the lifting surface on your indoor platforms or is there something else you would recommend? I'd prefer not to have to replace it over time...
That is correct.
Yes. I like MDF primarily because it's inexpensive relative to good plywood and it also will lie perfectly flat, which helps. I have always used MDF on the platforms in our gym, the only exception being the 4 newest ones I built for our new location; however, I only used plywood for those because I had to use 1/2" rubber and couldn't get my hands on 1/2" MDF at that time. We've had the same MDF top sheets on the other 6 platforms, jerk block platform and pulling block platforms for over 6 years without needing to replace them. The edges are chipped of course, but it doesn't affect function at all.
Forgot to add that I prefer also to cut the top sheet to 3' 6" wide rather than the normal 4', as it gives a bit more of a buffer zone for the bumpers to hit rubber. This makes it more costly due to the rubber widths and not being able to use exactly half of a 4x8' sheet of rubber, but worth it in the long run in my opinion.
Usable but a bit sketchy with split jerks. Just be smart about missing lifts and don't die trying to save a lift that's going into the wall.
I would talk to a landscaper - they'll be able to give you much better info on building durable decking on uneven and unstable ground.
Greg Everett
Greg Everett
Greg Everett
Greg Everett
Greg Everett
Greg Everett
Greg Everett
Greg Everett
Greg Everett
Alyssa Sulay