Articles
The Hook Grip: Why & How to Do It Correctly
April 23 2018

April 23 2018

Once again, I’m bewildered that I haven’t yet written an article on the hook grip here—this is one of the most fundamental pieces in the weightlifting puzzle, and also something that gives a lot of new lifters a great deal of trouble because of a misunderstanding of how the hook is actually created and held.
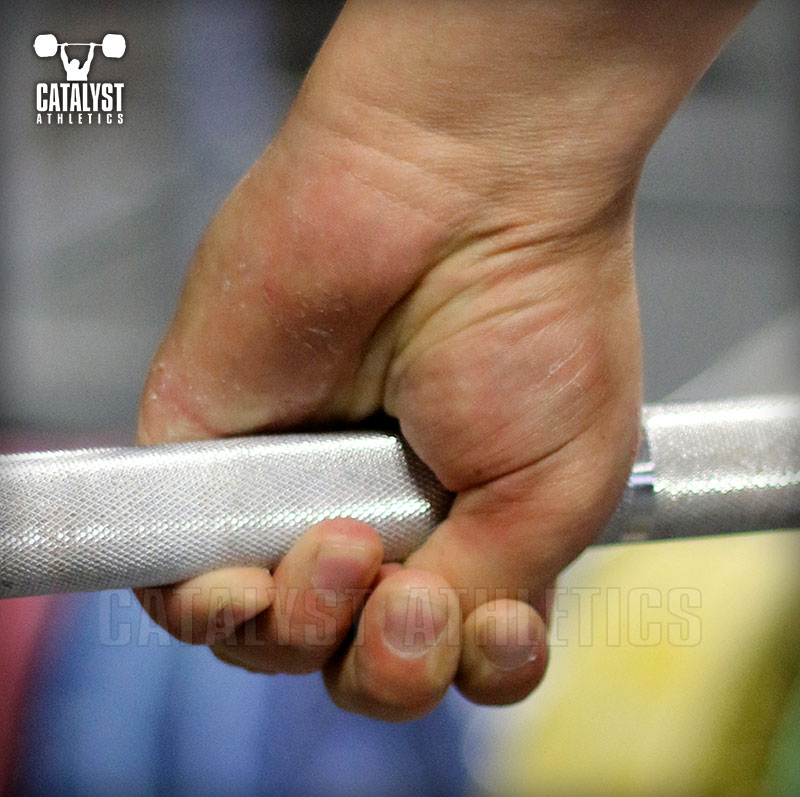
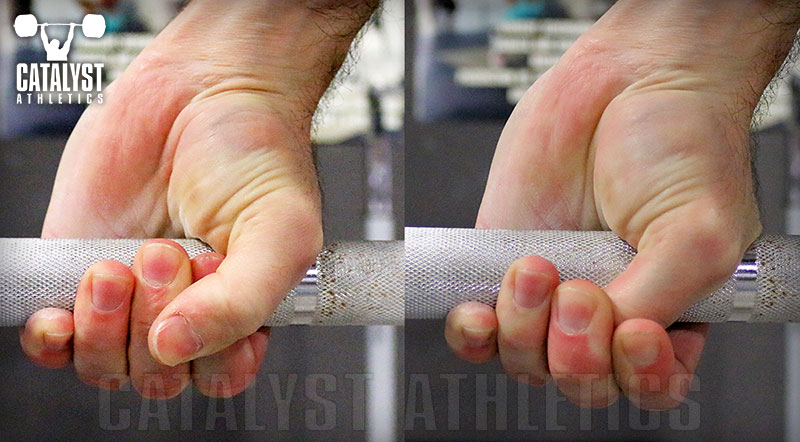
The hook grip is a pronated (palms facing the lifter) grip in which the thumb is trapped between the bar and usually the first and second fingers, depending on hand size. For the pull of both the snatch and the clean, this method of gripping is an eventual necessity to maintain control of the barbell during the violent explosion of the second pull.
It’s important to understand that the thumb is itself wrapped around the bar inside the fingers and not simply pinned parallel to the bar. With the thumb wrapped over the fingers as it would be in a conventional overhand grip, it will typically reach only the index finger and have a weak purchase on it due to being only partially flexed.
The fingers then grab onto the thumb to pull it farther around the bar. This is very important—you do not simply smash the thumb flat against the bar; you grab it with the fingers and try to pull it around the bar. This mistake of just pinching the thumb against the bar is usually what causes new lifters to believe the hook grip makes no sense—it’s just uncomfortable and doesn’t feel strong.
By wrapping the thumb around the bar directly, we create a powerful hook on the bar, which can then be reinforced by the grip of both the index and middle fingers. This allows the thumb to reach around the bar enough to significantly contribute to grip integrity without limiting the ability of the fingers to wrap around the bar adequately to grip it as well.

With the hook grip, the thumb is able to wrap farther around the bar than in a regular overhand grip, while the fingers are still able to wrap considerably, allowing more overall contribution to grip security.
The hook grip also creates a system that balances the tendency of the bar to roll. In a standard overhand grip, the bar is supported by the fingers, which all open in the same direction, creating a tendency for the bar to roll backward out of the hand. The mixed grip—one pronated and one supinated hand—is commonly employed in the deadlift by powerlifters because the backward rolling tendency on the pronated side is countered by a forward rolling tendency on the supinated side, thereby stabilizing the bar.
The hook grip creates a similar system of countering this tendency of the bar to roll while allowing the necessary movement and position of the hands and arms during the snatch and clean that a mixed grip precludes. The bar will try to roll out of the thumb in one direction, and out of the fingers in the opposite, eliminating to a great degree the spinning element of grip loss.

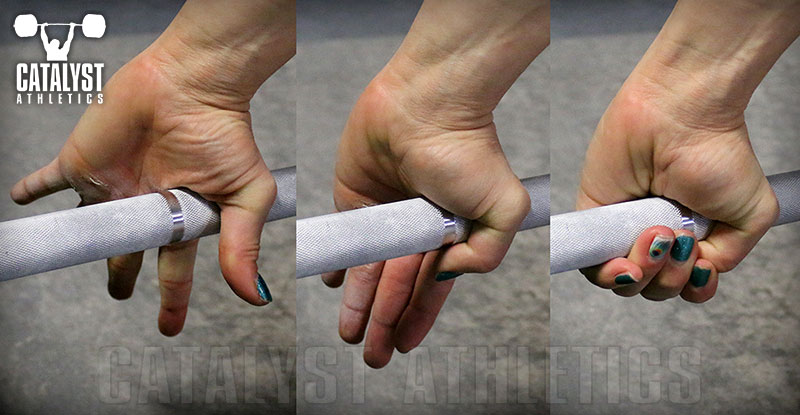
Setting the hook grip: Press the webbing of the hand between the thumb and index finger against the bar; wrap the thumb about the bar as far a possible; grab the thumb with the index and middle fingers; use these first two fingers to pull the thumb farther around the bar; grip the bar with the remaining fingers.
Finally, because of the increased security created by the hook grip for the reasons described above, the athlete can rely on lower levels of grip tension during a lift. This reduction in finger and wrist flexor tension allows a reduction in elbow tension during the pulling phases of the snatch and clean that improves the transmission of leg and hip power to the bar and the speed and fluidity of the transition between the second and third pulls. In short, the hook grip optimizes the anatomy of the hands for this application.
The more relaxed the athlete can keep the hands during a lift, the more relaxed the arms will remain, and the better the transmission of force from the legs to the bar will be. However, the hands can only relax so much before the grip begins slipping with the violence of the body’s extension. Depending on grip strength and hand size and shape, athletes will be able to maintain different levels of gripping effort, but all should make it a goal to grip only as tightly as necessary.
The wrist can be flexed somewhat so that the back of the hand is in approximately straight alignment with the forearm, which will relieve the thumb of some pressure and shift it more into the fingers. For most lifters, this will increase the comfort and security of the grip both by reducing the discomfort of the thumb and by allowing the shorter fingers to wrap farther around the bar. However, this is a minimal degree of wrist flexion—it is certainly not significant. Excessive wrist flexion in the pull will be similar in effect to partially flexed elbows; that is, it’s a weak point in the system that can extend during the explosive final extension of the snatch or clean and create a loss of force transfer to the bar.
Typically the hook grip will be uncomfortable if not considerably painful initially. Consistent use will condition the offending structures appropriately over time and the grip will ultimately offer no trouble. It will, in fact, become more comfortable than a conventional overhand grip with experience. Covering the thumbs with flexible athletic tape can reduce the discomfort and, for some, improve the feeling of grip security by increasing friction. Lifters can submerge the hands in ice water for 5-10 minutes after training to help reduce pain and speed the adaptation.
If taping the thumb (or other fingers) across a joint, it’s important to use elastic tape rather than conventional athletic tape. Non-elastic tape will limit the motion of the taped joint and create potential for sprains in the next joint up the chain. If elastic tape isn’t available, non-elastic tape can be used if wrapped and/or cut in a manner that prevents it from covering the back of the joint.
The hook grip is a pronated (palms facing the lifter) grip in which the thumb is trapped between the bar and usually the first and second fingers, depending on hand size. For the pull of both the snatch and the clean, this method of gripping is an eventual necessity to maintain control of the barbell during the violent explosion of the second pull.
It’s important to understand that the thumb is itself wrapped around the bar inside the fingers and not simply pinned parallel to the bar. With the thumb wrapped over the fingers as it would be in a conventional overhand grip, it will typically reach only the index finger and have a weak purchase on it due to being only partially flexed.
The fingers then grab onto the thumb to pull it farther around the bar. This is very important—you do not simply smash the thumb flat against the bar; you grab it with the fingers and try to pull it around the bar. This mistake of just pinching the thumb against the bar is usually what causes new lifters to believe the hook grip makes no sense—it’s just uncomfortable and doesn’t feel strong.
The thumb also creates a ridge for the fingers to dig into. Rather than just wrapping around the bar, which is smooth and has no real points of purchase, and squeezing, the fingers now have a protrusion to hook onto—not only does this make gripping something easier, but because it’s your own thumb, it’s actually naturally reinforcing your grip security.you do not simply smash the thumb flat against the bar; you grab it with the fingers and try to pull it around the bar.
By wrapping the thumb around the bar directly, we create a powerful hook on the bar, which can then be reinforced by the grip of both the index and middle fingers. This allows the thumb to reach around the bar enough to significantly contribute to grip integrity without limiting the ability of the fingers to wrap around the bar adequately to grip it as well.

With the hook grip, the thumb is able to wrap farther around the bar than in a regular overhand grip, while the fingers are still able to wrap considerably, allowing more overall contribution to grip security.
The hook grip also creates a system that balances the tendency of the bar to roll. In a standard overhand grip, the bar is supported by the fingers, which all open in the same direction, creating a tendency for the bar to roll backward out of the hand. The mixed grip—one pronated and one supinated hand—is commonly employed in the deadlift by powerlifters because the backward rolling tendency on the pronated side is countered by a forward rolling tendency on the supinated side, thereby stabilizing the bar.
The hook grip creates a similar system of countering this tendency of the bar to roll while allowing the necessary movement and position of the hands and arms during the snatch and clean that a mixed grip precludes. The bar will try to roll out of the thumb in one direction, and out of the fingers in the opposite, eliminating to a great degree the spinning element of grip loss.

Setting the hook grip: Press the webbing of the hand between the thumb and index finger against the bar; wrap the thumb about the bar as far a possible; grab the thumb with the index and middle fingers; use these first two fingers to pull the thumb farther around the bar; grip the bar with the remaining fingers.
Finally, because of the increased security created by the hook grip for the reasons described above, the athlete can rely on lower levels of grip tension during a lift. This reduction in finger and wrist flexor tension allows a reduction in elbow tension during the pulling phases of the snatch and clean that improves the transmission of leg and hip power to the bar and the speed and fluidity of the transition between the second and third pulls. In short, the hook grip optimizes the anatomy of the hands for this application.
The more relaxed the athlete can keep the hands during a lift, the more relaxed the arms will remain, and the better the transmission of force from the legs to the bar will be. However, the hands can only relax so much before the grip begins slipping with the violence of the body’s extension. Depending on grip strength and hand size and shape, athletes will be able to maintain different levels of gripping effort, but all should make it a goal to grip only as tightly as necessary.
The wrist can be flexed somewhat so that the back of the hand is in approximately straight alignment with the forearm, which will relieve the thumb of some pressure and shift it more into the fingers. For most lifters, this will increase the comfort and security of the grip both by reducing the discomfort of the thumb and by allowing the shorter fingers to wrap farther around the bar. However, this is a minimal degree of wrist flexion—it is certainly not significant. Excessive wrist flexion in the pull will be similar in effect to partially flexed elbows; that is, it’s a weak point in the system that can extend during the explosive final extension of the snatch or clean and create a loss of force transfer to the bar.
Typically the hook grip will be uncomfortable if not considerably painful initially. Consistent use will condition the offending structures appropriately over time and the grip will ultimately offer no trouble. It will, in fact, become more comfortable than a conventional overhand grip with experience. Covering the thumbs with flexible athletic tape can reduce the discomfort and, for some, improve the feeling of grip security by increasing friction. Lifters can submerge the hands in ice water for 5-10 minutes after training to help reduce pain and speed the adaptation.
If taping the thumb (or other fingers) across a joint, it’s important to use elastic tape rather than conventional athletic tape. Non-elastic tape will limit the motion of the taped joint and create potential for sprains in the next joint up the chain. If elastic tape isn’t available, non-elastic tape can be used if wrapped and/or cut in a manner that prevents it from covering the back of the joint.

In Snatch-Grip RDL & Snatch-Grip Bent Row, Hookgrip should be used?
Kindly educate me.
Regards.